Stonehenge Sky Replacement


The final image was created by compositing the cloudy sky image onto the image of Stonehenge.

Hybrid Animals

%20copy_.jpg)
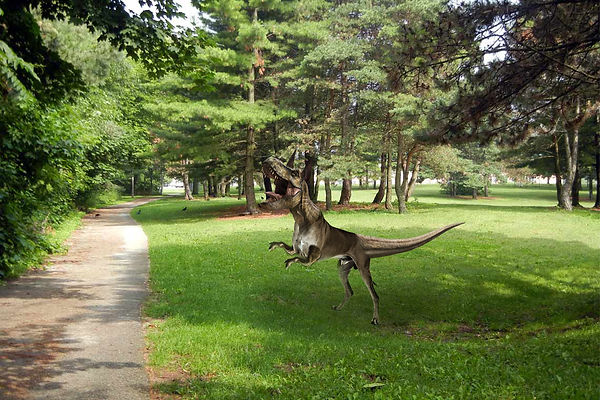
These images were created in a similar way to the Stonehenge image. Using an image of one animal as a base and selecting a part of another animal to composite on top it. Using a layer mask to smooth the edges of the added part.


Greenscreen in Photoshop


The above image on the left was created using the Greenscreen method. This is achieved by using the colour range selection in photoshop to create a mask. However just using the colour range selection leaves a green tinge around the edges of the masked image. To counter this a hue/saturation adjustment layer is used to desaturate the greens in the image, removing the green tinge.
Fake News
Fake News Initial Ideas – Ghost/haunted, Person on a roof, person where they shouldn’t be, object where it shouldn’t be (car on roof).
Ghost/haunted – face in window, historic person? Random person?
Person where they shouldn’t be – Popular figure in old picture/painting, Person on roof, floating person, person on side of building.
Object where it shouldn’t be – Vehicle on roof, military vehicle in a normal place, modern vehicle in old image/painting.
Person where they shouldn't be; person stood on the roof of a building in the background of a normal photo. E.g. person on top of Hampton Court in the background of a couples/family photo.
Source Images


I decided to take photos for the assignment at Hampton Court Palace. I went at around 12 O'Clock, as I thought that there would be a reasonable amount of people visiting the palace at this time. Having a good amount of visitors helps sell the realism of the later edited image as if if there were to be just one person in the photo it could look very staged.
The top three images would be used as the foreground for the edited images. I took photos of the front of the palace from different angles each time, to try and create a slight randomness in the collection of final images.
The image to the left is what I used to create the hooded figure stood on top of the palace in the edited images. I took this image at the same time as the others so that it would look more natural when composited into the other images, as it has the same lighting conditions and is taken by the same camera.
Composited Images

To add the hooded figure I used the quick selection tool to cut the person out of the image. Then added that cut-out into the foreground images and used a mask on the cut-out to erase the parts of the figure that would be hidden behind the walls.


For the 'zoom' effect I used the marquee tool to select the part of the image I wanted to zoom into, I then duplicated the image and deleted everything but the selected square of the duplicated image. Due to the high resolution of the image I had to add both a noise and mosaic filter to the zoomed section to simulate a drop in quality, which masks the composition slightly.


Maya Basics - House

James Bond Gadget

For this assignment I decided to start with a toaster as the household object. After looking on the Argos website I found this De'Longhi toaster to use as a reference. I picked the toaster as I felt that the smaller details would add some extra challenge to the model.

To start the model I created the basic shape of the body of the toaster. I started with a cube and used a mixture of scaling and extrusions, the extrusions were used for the toasting slots and lip on the body,
For the next step I added some minor details to the body. The additional elements are made from separate objects.


Next I added even more detail, including the indentations in the body for where the logo, gauges, buttons and LEDs would sit. The indentations were all created using edge loops and extrusions. The other details are once again separate objects.
By this point I had decided that I wanted to add wheels to the toaster, for the James Bond part of the assignment. I therefore decided to model an 'undercarriage' for the toaster where the wheels would be connected. I extruded down from the feet of the toaster that I had modelled earlier, and connected them together using the bridge tool. I also added springs using the polygonal helix object. I added the springs to help add some realism to the model.


I then modelled the wheels and tires, I decided to go for a monster truck/tractor style, as it's common to see that kind of tyre on remote control cars and gives the model a more rugged appearance.
Next I added an aerial to the toaster. I did this to show that the toaster is actually remote controlled.


This image shows the smoothed model ready for textures and rendering.

A quick render of the smoothed model
Fake News - F1 Car in Uni Car Park
Source Image:

To start I took a picture of the car park at the Paragon campus with a couple of empty spaces.
Using a model of a 1960's F1 car that I created previously, I decided to comp a render of the model into the photo above.


By attaching the photo I took to the perspective camera in Maya I was able to line the car up with the environment. I also used a plane with the aishadowmatte shader applied to capture shadow, however the hdri I was using to light the scene gave some strange looking shadows so I added the shadow in the final image in photoshop.
Here you can see the rendered image from Maya, along with the alpha channel. To get the alpha channel I used AOVs in Maya to render the albedo channel, this produced the image you see in the top left, which can be used as a mask in photoshop.


%2025_10_2018%2019_24.png)
Using photoshop I composited the render onto the original photo. I had to use the alpha channel mentioned above to cut the car out of the environment of the original render. I also had to mask the car that appears in front of the F1 car, I did this using the quick selection tool and quick mask.
Final Image:

James Bond Gadget
Final Render of Toaster:

Minibar Robot - Dave
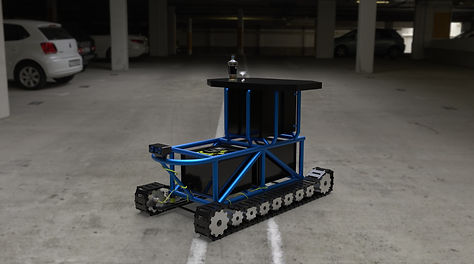


After modelling and rendering the toaster I decided that I should attempt another model to challenge myself more. I decided to create a robot minibar. I based the model off of the robots that Boston dynamics create, these usually have a tubular frame with lots of complicated looking pieces attached to central blocks.
Top Left: Render using a HDRI background.
Top Right: Clay render
Left: Composite into a picture of the kitchen in my flat. (using aishadowmatte).

To start I created the frame in which all the elements would sit. To do this I created a large amount of cylinder primitives and lined them up to create the shape. For the curved front section I created a curve using the three-point arc tool, and extruded the top cylinder around the curve created.
Next I created a 'head' for the robot where I added some lenses, this is all created from primitive shapes.


I then added two large cubes and used the bevel tool to round off all pf the edges. I also added a row of gears on each side, these will be used as guides for a tank style track.
Next I created the tracks. The tracks are made up of three different parts that connect together seamlessly to form a longer structure. To create the holes in the parts of the track I used the Boolean tool.


I then added various details.


Next I added the fridge section of the minibar. The door is a separate object to the rest of the fridge, the window part is an aistandard shader applied to the faces in the middle of the door.


Next I added shaders to the individual parts of the robot.
Right: Whiskey bottle model
Below: Rendered whiskey bottle


Final Composite image
The table cloth in the final image was created using nCloth in Maya.

'Studio' Render

Sketchfab 3D Model
Depth of Field


Top: Render direct from Maya
Bottom: Render with DoF effect applied in Nuke
I wanted to learn how to utilise the Z - depth AOV pass available in Arnold to create a DoF effect. I have previously used the inbuilt DoF effect in Arnold, however using a Z pass and Nuke allows you to have control over the effect after rendering.
To create the effect seen in the bottom image I rendered out a simple scene while having the Z AOV selected in Maya. I exported the render as an EXR file, this is a file format that contains the data from both the beauty pass and the Z pass. Opening the image in Nuke I added a Z_Defocus node, this uses the data from the Z pass to create a blur effect based upon the distance data contained in the EXR file.
Why reference is important


Left: Front of my house from memory.
Right: Front of my house with reference.
When drawing from memory I missed several small details, such as the amount of window panes, the design of the door and things like the house number.
NYC Rooftops
Above is a collection of reference images that I gathered right at the start of the project. I collected these images to give inspiration as to what style and how I would layout the scene and also acted as reference for modelling.

Below is a collection of renders of the fire escape that I modeled for this scene. I think that is very effective considering how simple the mesh is. I especially like the shadows that are cast by the staircase. I used substance painter to create the textures for the stairs, using a mixture of smart materials inside of substance painter to create the weathered/rust look. These textures improved the look of the model massively. Below is also a sketchfab link to the model.


Left is a render of the water tower that I created for the scene. I am pleased with how the tower looks as I feel I have got the proportions correct, I am a little disappointed with the texturing however, if I were to redo the textures I would use a darker metal on the body of the tower, this would match my research imagery better.
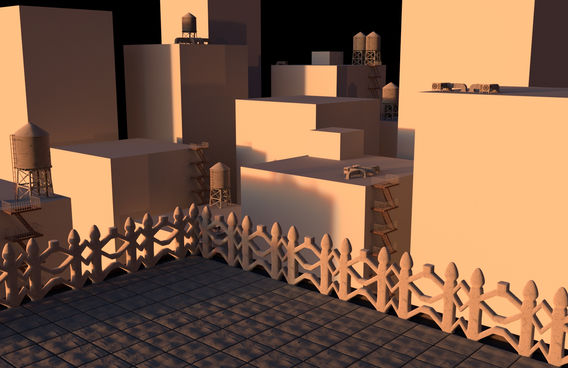
To the right is a gallery of lighting test that I did throughout the early development of the scene. To start with I created a blockout of the scene in order to place a camera in which I could build the scene around.
Once I had added a small amount of detail I experimented with different lighting. The images all use the aiphysicalsky shader, but with different height and azimuth settings. I really liked the shadows in the daytime render but preferred the overall look in the sunset renders, so decided to carry those settings forward.

A render of the air conditioning unit model. I had trouble with moving from substance painter to Arnold/Maya, especially with metallic shaders. However I am still pleased with the outcome.
A render of the patio section.


A render of the TV aerial.

A render of the satellite dish. To create the holes seen in the dish I attached a checker pattern to the opacity setting of the Arnold standard shader. I am pleased with the look this achieves.

Here you can see that I added a frame to the bottom of the main part of the aircon unit. I did this so I could attach them to window ledges in the scene.
Below are several models for windows and doors that I used in the final scene. I created several different types of window and door in order to have some variation.


Right is the initial blockout that I used in order to place a camera to build around.
Below is the scene after I started to add details to the buildings.


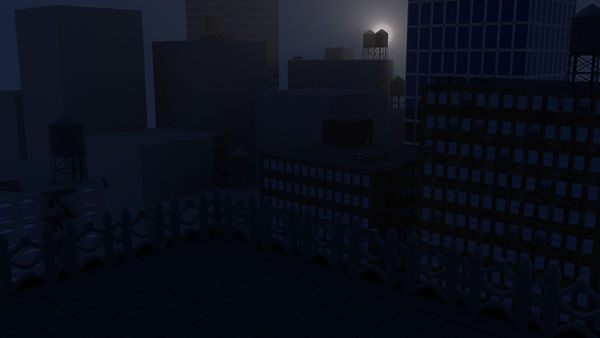
Right is a test render for night lighting, I decided to use two different lighting arrangements for my final renders to have some variation.
Below is a quick render test halfway through the set dressing and texture stage.

Right is a test render of the champagne bottle that is used as a centre piece in one of the final renders.

Below are the final renders from the project.
Time Leap
For the Time Leap assignment I chose to recreate a Formula One pit lane from the early 1970's. One of the reasons for choosing this period and setting was that I could use an asset I had previously created, a 1974 F1 car.

The first step I took was to gather reference imagery which I would use for modelling and scene layout reference.
I tried to gather a range of images of the various parts that would make up the scene; pictures showing the pit lane and pit buildings, objects that would appear around a pit lane and images of cars that are being worked on.
When moving into modelling and scene layout I found this range of images very helpful, and resulted in realistic final renders.
The next step I took was to take the model of the car that I had already created and make it modular. Doing this allowed me to take different parts of the car off, making it look like it was being worked on.
I also added some minor details to parts of the car were previously unseen, for example the radiator at the front of the car that is usually hidden by the front wing.

I then created a basic blockout of the scene. I did this in order to start placing cameras in the scene which would the allow me to build the scene around those camera views.

I decided to focus on one garage in particular for the final renders. I placed three cameras at different angles and placed the car model in that garage as a starting point.
Below you can see the renders from these three camera angles.


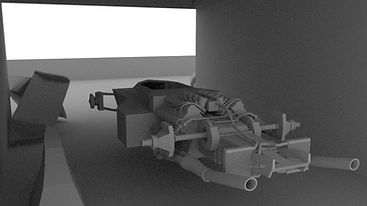
Next I added another car to the garage next to the main one. I deleted the parts of the car that couldn't be seen by any of the cameras.

I added detail to some of the remaining garages and added doors to some so that I didn't have to fill all of them with cars e.t.c.
Below you can see models of a spanner and toolbox that I created to add extra detail into the scene.


Next I added several viewing platforms to the tops of some of the garages, and a large building at the end of the pit lane. The main reason I added the large building was to make sure that the cameras wouldn't be able to see into the void where there's no geometry.

I wanted to have the scene to be in the rain, so I decided to add puddles to the pit lane. To do this I used the sculpting tools in Maya to create dents in the tarmac of the pit lane. I then created a plane (Highlighted in green) and applied a shader to it, this shader is highly reflective and slightly transparent.


To really sell that it was raining in the scene I had to add the splashes caused by the rain in the puddles. To do this I created a bump map. To create the bump map I used the radial gradient effect on a circle in Photoshop. I had to edit the gradient ramp as shown above to create the concentric circle look, once I had created one of the circles I duplicated it and randomly placed and scaled it over an 4K image.
The image to the right shows the result when applied to the puddle plane.


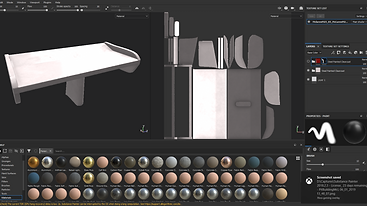

I then moved onto texturing. I used Substance painter to create all of the textures, only a few parts of the car, such as engine parts, use un-textured shaders.
Above you can see the process I used for texturing the body work of the cars. I started by applying a white clearcoat steel smart material as a base layer. I then added another clearcoat steel layer above that and applied a black mask to the the layer. Using the brush tool I could then apply various shapes and text that would appear painted on with red paint. I used a very similar technique for the pit buildings. Starting with a plain brick texture, adding a rusty steel material and using a mask so that only the roof had this material, then adding a layer of dirt, using a smart material allowed me to control the look of the dirt across the different textures to avoid obvious repetition. I then added a motar wall material, changed the colour to white and used a mask to add numbers and symbols that look painted on. Below you can see the final textured scene.


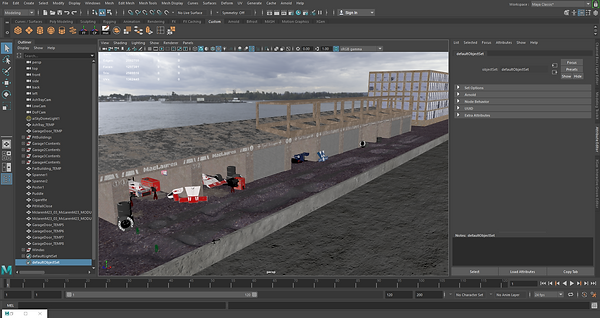
After rendering the final images I took two of them into Nuke to add a DoF effect, to do this I had to render those images with a Z-Depth AOV and save the file as a .EXR.
Once I was happy with the DoF effect created in Nuke I moved the images into Photoshop in order to add Rain and edit the images.
Right: The setup of the zDefocus effect in Nuke. Below: The result of the effect shown in Nuke.
![LowCam.nknc [modified] - Nuke 06_01_2019](https://static.wixstatic.com/media/15f6aa_6d3ae4fd79654140b02810bf6fb88f61~mv2.png/v1/fill/w_565,h_299,al_c,q_85,usm_0.66_1.00_0.01,enc_avif,quality_auto/LowCam_nknc%20%5Bmodified%5D%20-%20Nuke%2006_01_2019.png)
![LowCam.nknc [modified] - Nuke 06_01_2019](https://static.wixstatic.com/media/15f6aa_7ffc1134a55042d69985b9515b6f7d5a~mv2.png/v1/fill/w_565,h_299,al_c,q_85,usm_0.66_1.00_0.01,enc_avif,quality_auto/LowCam_nknc%20%5Bmodified%5D%20-%20Nuke%2006_01_2019.png)
Below you can see the setup of the Photoshop documents after editing. To create the rain I used a series of layers all with noise and motion blur applied, each layer has a different scale of noise and motion blur applied to it resulting in a greater feeling of depth to the rain.
I also edited the temperature, contrast and exposure of the images to get the feel to them that I was looking for.


