Unity Island Project
Reference/Inspiration Images
For this project I decided to go for an abandoned Ancient Greek theme, the reasoning for this is because of a personal interest in this period of history, and I also thought that this theme would allow for interesting usage of photogrammetry.
One of the main sources of inspiration for this project was Assassins Creed Odyssey, the game is set in ancient Greece. This was a great source for layout, architecture and props. Another useful source of inspiration was images of ruins of ancient Greek buildings, this was not only useful in modelling the overall look of ancient Greek architecture but also useful when adding details of destruction and wear.
Sketchfab Assets
Photogrammetry - Box

The first step in creating a model using the photogrammetry technique is to take photos of an object from 360 degrees. The more photos you take the more accurate and higher quality the output model will be.

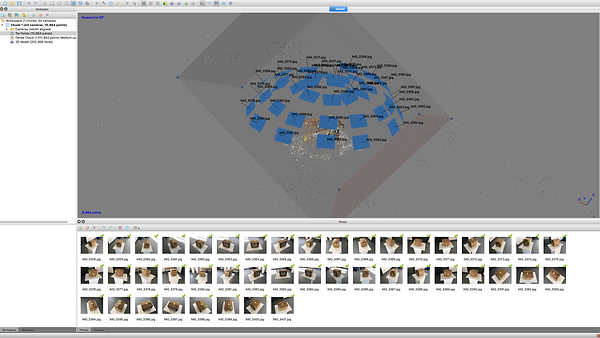
The next step is to use a program called PhotoScanPro to create a low density point cloud. The program takes the images of the object and builds a 3D point cloud using the data gathered.

Next you have to create a high density point cloud, this results in a point cloud with much more data. You can see in the viewport the box has become more recognisable.

Then using the software you generate a 3D model and texture which can be exported as an FBX file, which can then be imported into Maya.

The next step is to retopologize the model that the photogrammetry program creates. In the image you can see the high poly mesh that the program produces next to the retopologized version.


Next you have to transfer the textures from the high poly model to the low poly model. The first step in doing this is to unwrap the low poly model (You can see the UV editor top left). Next you have to use the 'Transfer Maps..' option in Maya. Using the high poly mesh as the source mesh and the low poly mesh as the target mesh, you can transfer the diffuse map as a 2K image. You can then clean the produced image in Photoshop as some errors can occur.
Island Creation - Assets


The first set of assets that I decided to create for the Island environment was the pillars that would be the main base for most of the structures in the environment.
In the two images to the left you can see the three different levels of development I went through when creating the main section of the pillars. The mesh on the far left is a completely standard, undamaged pillar section. The middle mesh has had a small amount of sculpting on the top edges, I did this to add a look of weathering and distress to the object. The final mesh has had high detail sculpting using the stamp tool. This adds an even more obvious and higher level of weathering and distress.


The next step in the creation of the main section of the pillar was the texturing. The following four images show the main layers that I used for the final textured model. The first image shows how the model looks when it is first imported into Substance Painter, the second image has the polished marble smart material applied, this acted as a base to build a more suitable, weathered texture on. The third image shows the mesh with a dirt material applied and a surface worn smart mask applied, this results in a dirty look in the crevices of the pillar. The final image shows the mesh with a layer that affects the height and normal maps of the texture. Using alpha maps of scratches to apply areas with negative height to add even more details.


The image to the right shows a completed pillar, which is made up of several main sections, a flared top section and a slab on top of that. You can also see an arch which is heavily inspired by the Parthenon.


The image to the left shows a collection of other structures that I modeled. I decided to model them all in the same Maya scene so that I had a reference for the scale of each piece, when I started the first model I imported one of the pillar sections as an initial reference.

Next I decided to model a Xiphos sword, this is the style of sword that was widely used during the time period. You can see in the second image that I used an image reference in order to accurately reproduce the shape.

I then decided to model a flag, I did this as the environment was looking very bare and in need of extra decoration.
As you can see I used another image for reference, in particular for the torn and damaged parts of the flag. The model is very simple as the majority of the detail would come from the texture.


The top image to the left shows the rough fabric smart material that I used as a base to build the design of the flag on.
In the second image you can see the final design of the texture. The design is made up of a bronze material that is controlled by a mask created using two ancient Greek style alpha maps. The second layer uses the same mask to alter the height and normal maps to appear to be on top of the fabric background.
I then decided to model a shield. I created a basic mesh in Maya, as similar to the flag, most of the detail would come from the texture. I did however add a small indent to the shape of the shield so that it wouldn't be completely flat.


The following images show the development process of creating the texture in Substance painter.
As with other models I started by applying a base material onto which I could add extra detail. For the shield I started with the Bronze Armour smart material as a base.
The next step I took was to add a layer with a Dirt smart material. I then replaced the mask that is automatically generated by the material with a different smart mask. The mask I added made the dirt appear more towards the bottom of the shield, I chose to do this as I was planning to have the shield be upright in the environment and felt that having more dirt near the ground would be more realistic.
Finally I added a layer to include detail and a design. This layer only affected the colour, height and normal maps. Using a variety of alpha maps I added the design, which I tried to keep inline with the design of the flag. I also added scratches and dents to the surface of the metal to give the impression that the shield had been damaged.
Next I created the photogrammetry models, the same process was used for both the models. The process is the same as it was for creating the cardboard box, however the retopology stage took a lot longer as the shapes are a lot more complex than the box.
The first step is to import the photos that I had taken of the statue at the V&A museum into PhotoscanPro. Once the photos had been imported, they had to be aligned. Aligning the photos generates a low density point cloud (Top image), this low density point cloud can then be refined to generate a high density point cloud (2nd image). The high density point cloud can then be used to generate a 3D mesh (3rd image).
Once the 3D mesh has been generated it needs to be exported as an .FBX file in order for it to be retopologised in Maya. The mesh has to be retopologised as it has a very high poly count which is unusable in Unity. To retopologise the model you have to make the exported mesh a live object, this allows you to model on top of the original mesh using the quad draw tool (4th image).
Once the model has been completely retopologised it has a much lower poly count (Difference seen I final image). After the model has been retopologised you have to transfer the texture maps from the original mesh to the new one.
Once the texture has been transferred the model can be exported from Maya and imported into Unity.


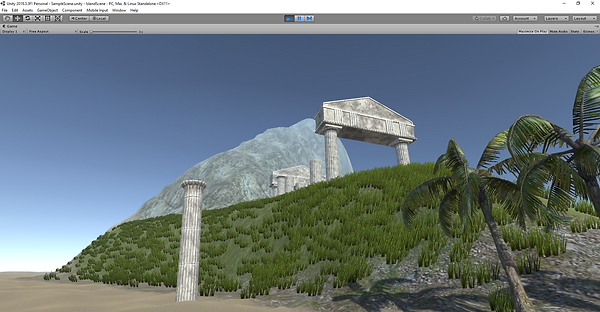
The final step was the creation of the Island in Unity. The basic shape was created using the terrain tools in Unity, along with the textures for the grass, sand and mountain. The 3D grass and trees were also aded using the built-in terrain tools (The island shape can be seen in the top image).
The next step was to populate the island with the assets that I had created earlier in the project. The two middle images show a work in progress shot of the island. The 4th image shows the final layout of the environment. There is a temple style area on top of the hill above the beach, there are several altars in the temple which have objects on display placed on top of them. There is a large staircase structure that leads to the temple area from the beach, there are several statues, pots and flags added as decoration to the structure. There is also a two tier half circle structure on the staircase. On the beach there is a small half circle structure, with two plinth's displaying pots and a small decorative pillar leading towards the staircase. Finally there are two large outer wall sections, I added these wall sections to close off the area from the rest of the island.
The final two images show the difference between the default look of Unity and the look with the Post Processing Stack applied. The post processing stack adds a variety of different effects the can be altered to give a specific feel and improve the overall look of the graphics of the environment.


Below is the final walkthrough video of the finished environment. Overall I am pleased with the outcome of this project. If I were to improve the project I would add more, smaller details, such as rubble and other debris, to improve the sense of realism of the scene.
James Bond Title Sequence
Inspiration Imagery
At the start of the project I decided to collect some inspiration and reference imagery for the style that I wanted to create the title sequence in. Using the style in Far Cry 3 Blood Dragon as my main inspiration I moved to After Effects to create a background for the title sequence.

To start I created a black solid an applied the Grid effect, then applied the corner pin effect to achieve a look of depth. I then added the hue/saturation effect to turn the grid purple, finally I added the glow effect.

Next I created another black solid and added the gradient ramp effect to the solid. I changed the start and end color's to purple and black, this results in the gradient sky look. I also added a mask to soften the edge of the grid.

Next I added a black solid and applied the CC Star Burst effect, this added a star field effect to the background.

I then added an adjustment layer and applied the camera lens blur effect, and added a mask. This resulted in a depth of field type effect.

Finally I added the Venetian blinds effect to another black solid, this results in a CRT style effect on the background.
The next step was to create silhouettes to be used throughout the title sequence. Using footage filmed in front of green-screen I used the Keylight plugin for After Effects to key out the background to be able to create the silhouettes.


The images above show the matte created by the plugin and the resulting effect in the bottom image.


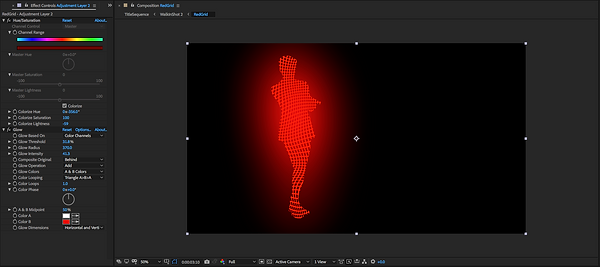
The images above show the progression of creating a stylised silhouette. To start with I applied the grid effect to a solid that has a luma matte applied, I also added a turbulent displacement effect to the grid and animated the evolution setting, this gives the grid a dynamic look.
The bottom image shows a dissolve effect, to create this I added the CC Scatterize effect and animated the scatter setting from 0 to 106 over a few frames, this results in an explosive looking dissolve effect.


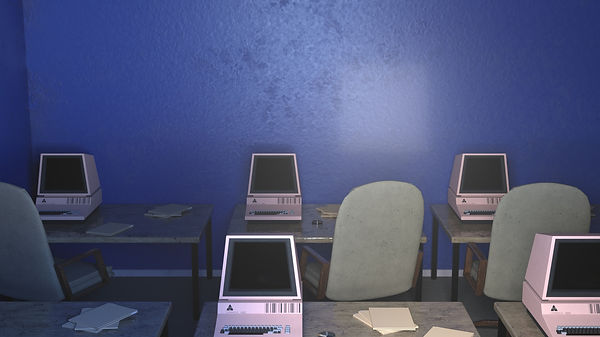
Next I decided to create a 3D introduction sequence, for this sequence I created a 1980s office scene. I animated a camera flying towards a blank computer screen, this allowed me to transition from the black screen to the start of the After Effects sequence.

Above is a frame of the sequence render of the finished scene. For the final title sequence I added some particles and colour correction to the sequence render.


The final step was to add titles for cast and the film title. To create the final look of the titles I first added a gradient ramp from a purple to a white, then I added a bevel emboss effect to give the title a 3D look. Next I added a glow, then animated the titles scale from 0 to the correct size and applied the motion blur effect.


